Canon R5 Firmware V1.70
After watching a number of videos I found it frustrating to easily summarize the recommendations they were trying to make. Even if you disagree with my settings below I hope this method will be useful for you to store the settings YOU want so you can return to them if they get lost. I have not seen anyone using simple, tabular methods to describe the camera settings.
In this case I have described the settings for the R5 most of which should be fine for the R6 as well after adjusting for some physical differences between the cameras (I have to program it and will find out). My R6 is astromodified but is fully capable of taking regular photos with a drop in filter (hot mirror filter) in place with the EF lens adapter. I have been focusing on the use of the Canon RF 100-500 with a Breakthrough Photography on lens CPL. I will have to test the R6 using the Sigma 150-600 Sport lens for now.
After experimenting with double back button focus last weekend I decided to try some tweaks and I think I came away with a lot more sharp shots. I still am debating the use case of mechanical, electronic first curtain and electronic shutter but for most fast photography it seems mechanical really is the safe bet. For still photography (or relatively still photography) I think I am game to try electronic first curtain and electronic for certain applications and to reduce wear on camera components.
So basically when you turn on the camera you find yourself in a fast bird in flight acquisition mode that is manually adjustable and focus is controlled by the back button and not the shutter button. Most of the settings allow you to just quickly change things to suit the situation you find yourself in. The DOF button gets assigned a toggle of turning eye tracking on and off. You can use the dials to quickly change ISO, aperture, and shutter speed and even the focus method. If you turn off the camera it reverts back to the programmed settings unless you purposefully overwrite the C1 mode (by registering the setting on submenu 5 of the ‘wrench menu’ ).
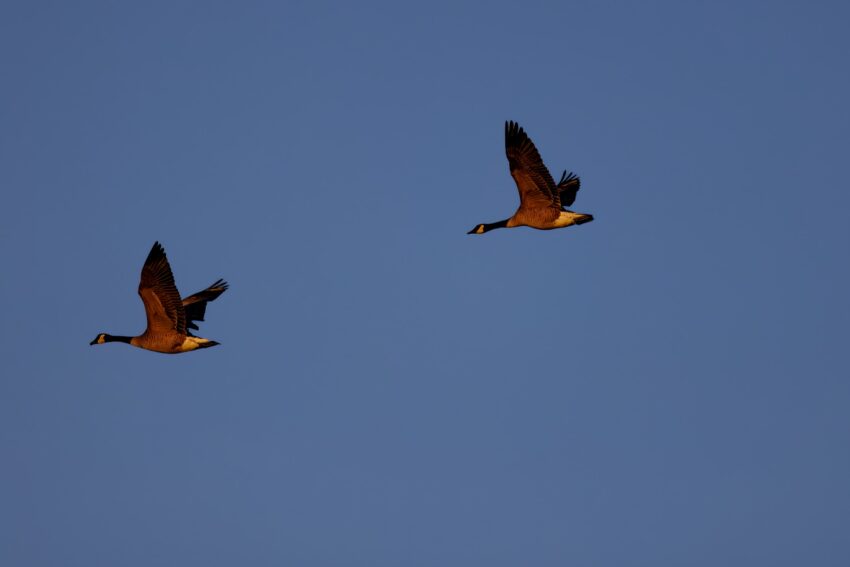
This capability allows you to get pretty far away from where you may want to be if a bird in flight appears!
So you find yourself taking mostly stationary bird shots, decide to slow down the shutter, maybe you control the ISO, change to spot auto focus and aperture at F/11 to get the look you want. But along comes that eagle you have been looking for! So the “star button” better described as the AE Lock Button comes into play. So you hold the AE Lock button down and you are back to eye detect with tracking, auto iso, -2/3 exposure compensation so you can get your shots (so you have to hold down the AE Lock button and when you want to shoot you press the shutter button, usually I have it in a low speed continuous mode). When you pick your thumb off the AE Lock button you are back to wherever you had the camera before you hit the AE Lock Button. In this case back to the settings you had tweeted while working on more stationary birds.
One thing the AE Lock Button will not override is the shutter mode. If you have moved into electronic mode and find yourself trying to shoot a fast moving bird using the AE Lock Button “override” it is still going to shoot electronic. Unless there is a really big reason to shoot electronic I think for now I am sticking with mechanical mode and until I really understand the best use and limitation for each. For very fast birds electronic shutter is likely to produce rolling shutter (basically bending the object or the background) as you try to track a fast moving object. I think for this use case of shooting birds in flight it is really the best to stick mechanical for the R5 and will not try to describe where electronic first curtain or electronic shutter modes fit into overall bird photography for me in this discussion.
We won’t walk thru it here but the other ‘quick mode’ button is to hit that video record button while in photo mode so you can grab cool scenes of birds in flight diving into the water or other quick scenes you want to video vs getting a still image. That will be the subject of a separate post.
Canon R5 Custom Shoot Mode (C1) for photography
Setup to go after eagles and similar speed birds in flight. The exposure compensation of -0.75 may require tweaking depending if shooting Bald Eagles and white gulls (some suggest -1.5 would be better). Darker birds or situations (maybe snowing) may require some tweaking.
First thing I did was to go to Manual mode and then save it to Custom Mode 1 so that we are working with all the features. I find that the custom modes can have various priority modes embedded (C1P, C1M, etc). I also put it in high speed mode while I went thru the settings so I can select the high speed display option to be turned on to suppress lower frame rates. It only matters if I am actually in high speed continuous (which usually I am not) but if I happen to be I want the system to show me what is going on. I am usually going to stay in mechanical mode for these bird in flight shots, I don’t want the warping associated with electronic shutter.
By the way I never check the option to update the custom settings automatically, when I turn off the camera it reverts to the settings I have programmed!
Photo Settings
First put your camera in photo mode (mode and hit the INFO button to switch between video and photo) and choose C1 (after having first established manual as the basis for Custom Mode 1). These settings are shown for using the Canon RF 100-500 lens expecting to use F/8.0 to get a little more sharpness (it could go to 7.1 at 500mm or down to 4.5 at 100mm). Basically this is a depth of field decision and is rapidly changed if you want to do something different using one of the wheels to change it.
So what do you see when you first turn on the camera in the C1 mode?
Quick Menu Settings at Startup
| Menu | Sub menu # | Item |
|---|---|---|
| Quick | Shutter | 1/3200th |
| Quick | Aperture | F/8.0 |
| Quick | EV (exposure comp) | -2/3rds |
| Quick | ISO | Auto |
| Quick | AF Mode | Track with Eye detection |
| Quick | Mode | Servo |
| Quick | Photo Storage | Card 1 (type B) |
| Quick | Video Storage | Raw to 1 (type B) |
| Quick | Drive mode | Low continuous |
if you turn the camera off these settings will come up (not what you had when you turned off the camera!)
Button and Dial Functionality at Startup
| Menu | Sub menu # | Item | Selections |
|---|---|---|---|
| Shutter Btn | Half Press | Meter start | |
| Full press | Take photo | ||
| AF Btn | Meter and AF Start | Click Detail | |
| AF Operation | Servo | ||
| AF Method | – (no change) | ||
| Servo AF Char | – (no change) | ||
| M-Fn Btn | Select Dial Fn | Standard | Rotates thru Settings |
| DOF Preview Btn | Eye detection (on/off) | ||
| Multi Controller | Direct AF Pt Select | Selected it on! | |
| AE Lock Btn | Register/Recall | Detail Set | |
| Shoot mode | M | ||
| Shutter Speed | 1/3200 | ||
| Aperture | 4.5 | ||
| ISO | Auto | ||
| Meter mode | Evaluative | ||
| Exp Comp | -2/3 | ||
| White Balance | AWB | ||
| AF Method | Face+track | ||
| Track Sens | -2 | ||
| Accel/Decel track | +2 | ||
| AF | On | ||
| Main Dial | Shutter speed | Quickly Change Shutter | (Standard settings for all 3 dials) |
| Quick Ctrl Dial 1 | Aperture (AV) | Quickly Change Aperture | (Back dial around set) |
| Quick Ctrl Dial 2 | ISO | Quickly Change ISO | (Top Dial around mode button) |
if you turn the camera off these settings will come up (not what you had when you turned off the camera!)
Shoot Menu Settings
| Menu | Sub menu # | Item | Selections | Sub-selection |
|---|---|---|---|---|
| Shoot | 1 | Image quality | RAW | |
| Shoot | Record Func | Sub menus | ||
| Shoot | Separate | Disable | ||
| Shoot | Stills | Standard | ||
| Shoot | Video | Standard | ||
| Shoot | Still play | 1 | ||
| Shoot | Video play | 1 | ||
| Shoot | ISO speed settings | Sub menus | ||
| Shoot | ISO Speed | AUTO | ||
| Shoot | ISO Spd Rng | 100-25600 | ||
| Shoot | AUTO Range | 100-25600 | ||
| Shoot | HDR PQ | Off | ||
| Shoot | 3 | White Balance | AWB | |
| Shoot | Picture Style | Fine Detail | ||
| Shoot | Lens Ab Correct | Multiple selections | ||
| Shoot | Per illum | On | ||
| Shoot | Dist Corr | On | ||
| Shoot | DIg lens opt | Standard | ||
| Shoot | 6 | Shutter mode | Mechanical | |
| Shoot | Release w/o card | ON | ||
| Shoot | 7 | Touch Shtr | Off | |
| Shoot | Image Review | Off | ||
| Shoot | High Speed Display | On | ||
| Shoot | Metering Timer | 8 sec | ||
| Shoot | Exp Simulation | Enable | ||
| Shoot | Shoot Info Disp | (Sub menus) | ||
| Shoot | Settings | All | ||
| Shoot | Grid dis | 3×3 # | ||
| Shoot | Histogram Disp | Brightness | ||
| Shoot | Small | |||
| Shoot | Focus Dist | Always | ||
| Shoot | 8 | Disp Perform | Smooth | Sub item to select |
| Shoot | Checked suppress |
AF Menu Settings
| Menu | Sub menu # | Item | Selections | Sub-selection |
|---|---|---|---|---|
| AF | 1 | AF Operation | Servo AF | |
| AF | AF Method | Face + Tracking | ||
| AF | Subject | Animals | ||
| AF | Eye Detection | Enable | ||
| AF | Continuous AF | Disable | ||
| AF | Touch&Drage | Enable | Relative, Right | |
| AF | 2 | MF Peaking | On | High, Red |
| AF | Focus Guide | On | ||
| AF | AF-Assist | Off | ||
| AF | 3 | Servo AF | Case 2 | |
| AF | Track Sens | -2 | ||
| AF | Accel/Decel | +1 | ||
| AF | 4 | Switching Tracked | 0 | Initial Priority |
| AF | Lens Drive AF Imp. | On | ||
| AF | Limit AF Method | All selected | ||
| AF | AF Meth Control | Focus Button+Dial | Quick Chng focus method | |
| AF | 5 | Initial Servo pt | Auto | |
| AF | Electronic Full MF | Enable |
if you turn the camera off these settings will come up (not what you had when you turned off the camera!) unless you register the new settings over top the C1
Ninja V+
I verified that if I use the following settings on the Ninja V+ i can record the output of the camera during ‘stills mode’ to show what the photographer sees and also to help review menu settings. It’s not perfect because you can’t use the touch screen to move the focus point around for instance and you can’t use the viewfinder. But after only getting the settings to work a few times I think I have found specifically what I need to do to record my camera in stills mode. I can also use the Atomos Connect to record the settings on the ninja v+ (record them to a ninja V attached to the Ninja Connect).
This has driven me a bit crazy for a while!
On the wrench menu set the HDMI Resolution the 1080p
On the Playback menu set the HDMI HDR output to Off
Input on the Ninja V+
Legalize on
HDR auto on
Output PQ
gamut Rec 709
Record on Ninja V+
Codec h.265
Compression h.265 HQ (all compression modes worked LQ, HQ, etc)
Video Settings when you hit the video button (Custom Video C3 settings for birds)